Friday, July 3, 2015

Sewing Underthings

I went through a "sewing phase" a few years ago where I was obsessed with the idea of making my own lingerie.  I made several camisoles, 2 almost completed underwire bras, and a very comfortable sports bra that I used as a nursing bra. 

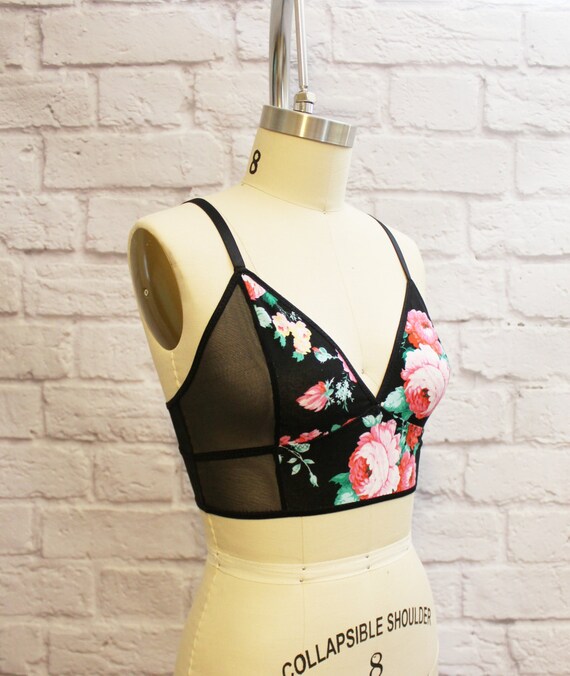
There seems to be a resurgence of interest in sewing lingerie and there are amazing classes on Craftsy by experts in the field, so I've developed interest once again.  I pulled those two almost finished bras out of my to-do box and plan on finishing those up in a week or two.  I also discovered that I had cut out, all ready to go - my favorite sports/nursing bra - so I sewed that up today.

I don't nurse anymore but it's still an amazingly comfortable bra - great for lounging and enough support for a yoga class.

The pattern is by Jan Bones of Lingerie Secrets.  I met her and took a class from her a few years ago at the American Sewing Expo in Novi, Michigan.  She's incredibly gifted and a great teacher.  She makes sewing knits and elastic applications understandable and easy.  Here's a link to her website:  Sewing Lingerie

http://sewinglingerie.com/patterns/crossover-bra.html


I used a cheap cotton lycra fabric from my stash and elastics from Sew Sassy - my go to source for lingerie sewing supplies.


Here's quick how-to on sewing the elastic edges:

On the top edges I used this technique:

Line elastic up with the edge of the wrong side of the fabric.

  • My regular sewing foot has two red markings that are exactly 4.0 mm apart and mark the exact width of my zig-zag stitch.  I sew on on the very edge of the left side of the elastic, using the red marks as my guide
Here are my stitch settings:


  • After attaching the elastic on the wrong side it should look like this


  • Then fold it down and stitch on the folded edge - same zig-zag stitch


  • When you flip it over you'll have a lovely finished edge.  I used black thread so it could easily be seen for the illustration, but I prefer to use thread the same color as my fabric.


I'll show the fold-over elastic application in my next post.  I'm making another bra from a new pattern I just bought from Ohhh Lulu
It uses fold over elastic to bind all the edges.

https://www.etsy.com/listing/195959838/longline-bralette-sewing-pattern-ohhh?ref=shop_home_active_1


Be comfy and make something beautiful!

Jen


Wednesday, May 20, 2015

Work Wardrobe


Establishing a beautiful and varied work wardrobe is an expensive and frustrating task.  Suits that are well made and fit well are expensive.  I've been slowly working on a few patterns that I am finessing the fit so I can make up a plethora of well fitting basics:  pants, skirts, tops, and jackets. 

I've completed my first outfit:  A pair of navy trousers with a bright blue pinstripe and a medium blue top with white polka dots.  These fabrics were bargain fabric - each less than $4 per yard - so I felt comfortable with possible screw-ups (i.e. I could throw them in the trash if they didn't work). 

Pants: 
  • Pants are the Thurlow Trousers from Sewaholic Patterns (these patterns are specifically designed to fit pear-shaped women like myself - small on top, wider on the bottom):
Thurlow Trousers by Sewaholic Patterns - Envelope Cover

  • I sewed one size smaller than I did the last pair because I've lost a little (very little) weight and my other pair of Thurlows was too big.  (It looks like there is a spot on my rear, but my son took this photo and he smudged up the camera lens)
 
  • I experimented with the waistband finish - I took it out and re-did it about 4 times (maybe 5).  I like the bound edge - I think it looks more like RTW.  I have a couple of pant classes on Craftsy, but none of them covered the technique exactly how I wanted it done - so I examined several pairs of my pants and Mark's pants to see how they were put together.


  • The pinstripe fabric is a wool/poly blend that looks like linen.  Strange though it sounds, it's actually a great summery weight and the bonus - it does not wrinkle.  Not at all.  I looked crisp at work ALL day.


  • I wanted a little flash - so I piped the front pockets in bright blue and made the back welts bright blue too.  


Top:

  • Another Sewaholic Pattern - the Pendrell Blouse

Pendrell Blouse sewing pattern - front of pattern envelope.

  • This is an easy to sew, versatile top that works well under jackets or on its own.  It goes together so quickly - no closures.  Binding the edges of the neck and armholes can take a little patience, but with practice it is a lovely finish and particularly nice if you are going to sew it up in a sheer fabric (no big facings).
  • I'm probably going to tweak the fit - it's a roomy top but the princess seams give it some shape.  I think I'd like it a little closer fitting.  Also - it is very long.  I adjusted it 2 inches shorter before cutting and the cut another 2 inches off before I hemmed it.
  • I can't wait to try the sleeve variations.


 Make something beautiful!
Jen

Saturday, January 24, 2015

Corduroy jeans - completed!


I finished the "Casual & Smart" pants pattern from Ottobre Design Magazine 6/2014 issue.  They are made from a light/mid weight fine-wale red cotton stretch corduroy  (that's a lot of adjectives).

They are very slim-fitting - if I sew another pair for my son I will size up so he can wear them longer.


One change I made to the pattern was to make the waistband adjustable.  I figured out how to do this by looking at a pair of my son's RTW jeans.
  • I made the buttonholes and sewed on the buttons (recycled from jeans that no longer fit him) on the inside of the waistband prior to attaching it to the jeans.  
  • Once the waistband was completed, I threaded buttonhole elastic through the button hole openings and then stitched the ends securely using a zig-zag stitch.  
  • This stitch is hidden under the first belt-loop.


Here's a back view.  I love the unique pockets.


Here are a few "action" shots on my son.  We both love the fancy curved seam down the leg.


And finally, I think these pictures show how the elastic in the waistband really helps these fit him better.  The first photo is without cinching up the elastic - there's a significant gap in the back.  The second photo shows the elastic pulled in.


For construction techniques I referred mostly to the online Craftsy class,  Sewing Designer Jeans - Angela Wolf, Instructor.  This is probably the best class I have purchased on Craftsy.  You will sew jeans like a pro.


Sewing Designer Jeans


The best part of this endeavor was putting them on my son and remarking that they looked like something you might buy in the store.  My son said "No they don't!  They look like your beautiful work, Mama."

Make something beautiful!
Jen


Thursday, January 15, 2015

They fit!

I am nearing completion of the New Year's corduroys.  This evening I finished the front and back crotch seams and inseams.  The only steps left are the waistband, button and hem.

I tried them on my son, sans waistband, to see if I wanted to make the waistband an adjustable one. It's fairly easy to do - you insert buttonhole elastic, which is readily available at craft/sewing stores.  Although they fit him perfectly, I may still put the elastic in - he has a prominent rear end that can make for a gapping waistband when he sits down.  Also, I highly recommend going up one size and maybe two sizes based on your child's measurements - these are very slim fitting pants.  This is a European size 140 - a US size 12 equivalent.  My son is a very large 7 year old - but in RTW he wears a size 10.

I love the pencil-slim fit of these pants and the curved, top-stitched side seams give an even slimmer look.

The photographs are horrible - I had to pry him away from Plants vs. Zombies and he was not very cooperative. 

When they are finished I will post more professional looking photos.


For pant/jean construction reference I used my Craftsy Class - Sewing Designer Jeans by Angela Wolf, the Ottobre instructions and my own familiarity with sewing pants.

I highly, highly recommend Angela Wolf's class - she has so many wonderful tips for making your jeans look professional.  

http://www.craftsy.com/class/sewing-designer-jeans/460?_ct=sbqii-sqjuweho-dum&_ctp=18&rceId=1421374936111~p4h8qyif

Make something beautiful!

Monday, January 5, 2015

Project ADD

I have a hard time concentrating on a project for more than a short period of time.  I do steps, take a break, and then start again.  I also get bored easily or distracted easily - hard to distinguish sometimes - and I always have at least two if not three or four or more projects in various stages of completion going at the same time.

There is actually a benefit to this in my resolution to sew everyday.  I got stuck with the corduroys because I don't have a zipper that I find satisfactory and I am at a stand-still until the one I just ordered comes in the mail.

Luckily, I can still sew everyday because I have so many, many project that need work!

Here is one that I am slowly approaching because it involves quilting skills which are not my strong area.

It is a large zip around organizer with clear vinyl, zip close pockets for carrying and organizing my sewing supplies.  It's a class on Craftsy called Sew Sturdy Travel Organizers - you get two patterns plus the video instructions for putting them together.  It reminds me of something from Vera Bradley.


I have been slowly machine quilting the fabric which will eventually be cut into the pieces that I need to complete the organizer.

Since I was out of luck with the corduroy project, I ended up finishing the quilting. Yay!
I will not even attempt to instruct anyone on quilting methods.  I consulted my mother, who is extremely skilled, and opted to do a 1" diamond pattern.  I would also refer you to Craftsy.com for anything else quilting you want to learn, including this class.  The price pretty much covers what you would pay for the pattern.

One thing I have enjoyed about machine quilting this myself (next time I'm paying a friend with a long-arm quilter) is drinking in this beautiful fabric.  I love the all the shades of blues and greens and the tiniest pop of chartreuse.  These type of projects really let you spend time loving your fabric.

This is an Amy Butler fabric - it's from the Lark collection and it's called Gypsy.  I think it's heavenly.  It was going to be a new yoga mat bag, but the organizer will be lovely too.

Make something beautiful!
Jen

Friday, January 2, 2015

New Year's Corduroys

I want my sewing in 2015 to be prolific and productive.  I think each New Year of all the ways I'd like to change and improve and the list gets longer and longer until I realize it would really be impossible to achieve every single goal - there aren't enough hours in a day and frankly, the extra 10 pounds are worth the happiness of eating what I want.

I do, however, have one simple resolution for this year:  sew everyday.  No rules on how long or how much, just sew and do it daily.  My mind is brimming with what I want to accomplish:  a wardrobe of beautiful suits for work, gorgeous perfectly fitting designer jeans, my child in adorable, unique clothes, my husband in custom fit dress shirts, my home decorated with custom draperies, slipcovers, and hand embroidered pillows and wall hangings, craft more beautiful dolls.  No way can I possibly do all this.  But I can sew everyday and by doing so, I know that some of these will be accomplished.

I got a tool to help me with this:

http://fashionary.org/planner/

It's a smallish sized planner where I can write briefly what I sew each day and on the facing page there are blank lines for additional notes on the projects I'm sewing that week.

My side resolution is to participate in some form of sewing education each day.  That is: watching a video (I've got a whole bunch of classes I bought at Craftsy to keep me busy) or reading a sewing article (Threads magazine is excellent) or sewing book or book on fashion or fashion history.  I haven't placed time limits on this either - I think that is freeing.

If you haven't read The Artist's Way by Julia Cameron I highly recommend it. I think anyone - even those who don't think they are creative - can find benefit from part, if not all, of her book.  My goals for sewing are in part based on Ms. Cameron's techniques.  (Morning pages are one of the best disciplines and benefits of her method).

If you haven't clicked away from my blog yet, I will show you my progress for the first two days of January:

Rivets:

I think I mentioned in a prior post that I'd go into more detail with rivets - here you go.

First the Tools:


  • Hammer
  • Sample block of man-made "quartz" (I got this when we were remodeling our kitchen and choosing new countertops)
  • Rivet
  • Eyelet Cutter
  • Snippers (for cutting the base of the rivet) borrowed from my husband who has many tools for model rocketry that are quite useful for sewing.
Process:

  • Place the fabric on the quartz.  You could use something similarly hard - metal or other, but wood is too soft.
  • Use the eyelet cutter to punch a hole in the fabric for the rivet.  Position the cutter and gently tap a few times with the hammer.
  • Place bottom piece of rivet underneath and through the hole.
  • Then snip it down so it's only a smidge (that's technical) above the fabric (see below)
  • Place the top of the rivet over the bottom and gently hammer (with the quartz underneath)
  • Turn it over and hammer from the back side until it is securely set.
  • Voila!  Rivet!
I also sewed the back yokes on today.  Yesterday I did the front pockets.  Steps left:  Fly front/zipper, side and inseams, waistband and beltloops, front button and hemming.

Make something beautiful!
Jen