Sunday, July 6, 2014

Pretty Summer Sun Dress

I don't wear a lot of dresses.  I like the freedom of pants - wearing a skirt or a dress means I have to concentrate a lot harder on being lady-like.  However, I am drawn to pretty dresses and I'd really like to incorporate them into my wardrobe - and be more comfortable wearing them.

I thought this Burda dress (from the April 2014 magazine, pattern 120) was particularly pretty.  I love the pleating details and little button loop front closure.  It's not a dress style I would normally choose, but I hoped it would end up looking as flattering on me as it did on the model, even though I am not tall and thin but actually really short and sturdy.

120_large

That being said, my initial impression after finishing and trying it on was that it looked like a maternity dress.  I'm not used to having all this flowing, floaty fabric, so I was considering wadding it up and throwing it my "learning experience" trash can.

I decided, though, to have my husband take a couple of photos of me in the dress so I could get a better perspective on how it looked.  I think I like it.


(my eyes are closed, but this was the best picture of the dress )

Cute back view

Lots of room for putting away some serious barbecue

Pregnant or Burrito Grande?  Burrito Grande.


Anyhow, I'm so glad to be done with this project.  I'm sure I'll wear this at least a few time this summer (and mom, I've got a slip on underneath :)).

Pattern / Sewing Details:

  • Intermediate level sewing.  Button loops, pleats, lined bodice, princess and curved seams, elasticized waist - some of these details are quite tedious
  • The pattern is drafted beautifully - everything lines up - even with all the alterations I made to take from a "Tall" to a "Petite" size
  • I know generally people get frustrated with Burda instructions but I found them to be more than adequate with no really confusing directions.
  • Interface the tie bands unless you want them to twist and wrinkle and look cheap and home made. 

I've got a couple of gorgeous blouses up next from this so-stylish pattern from Hotpatterns and the fabric is this amazing Roberto Cavelli silk-like cotton print that my mom brought me back from Cyprus.


http://www.hotpatterns.com/hp-1137-riviera-summer-breeze-sleeveless-tops/ 


Make something beautiful!
Jen

Tuesday, June 17, 2014

Summer Patriotic Dress

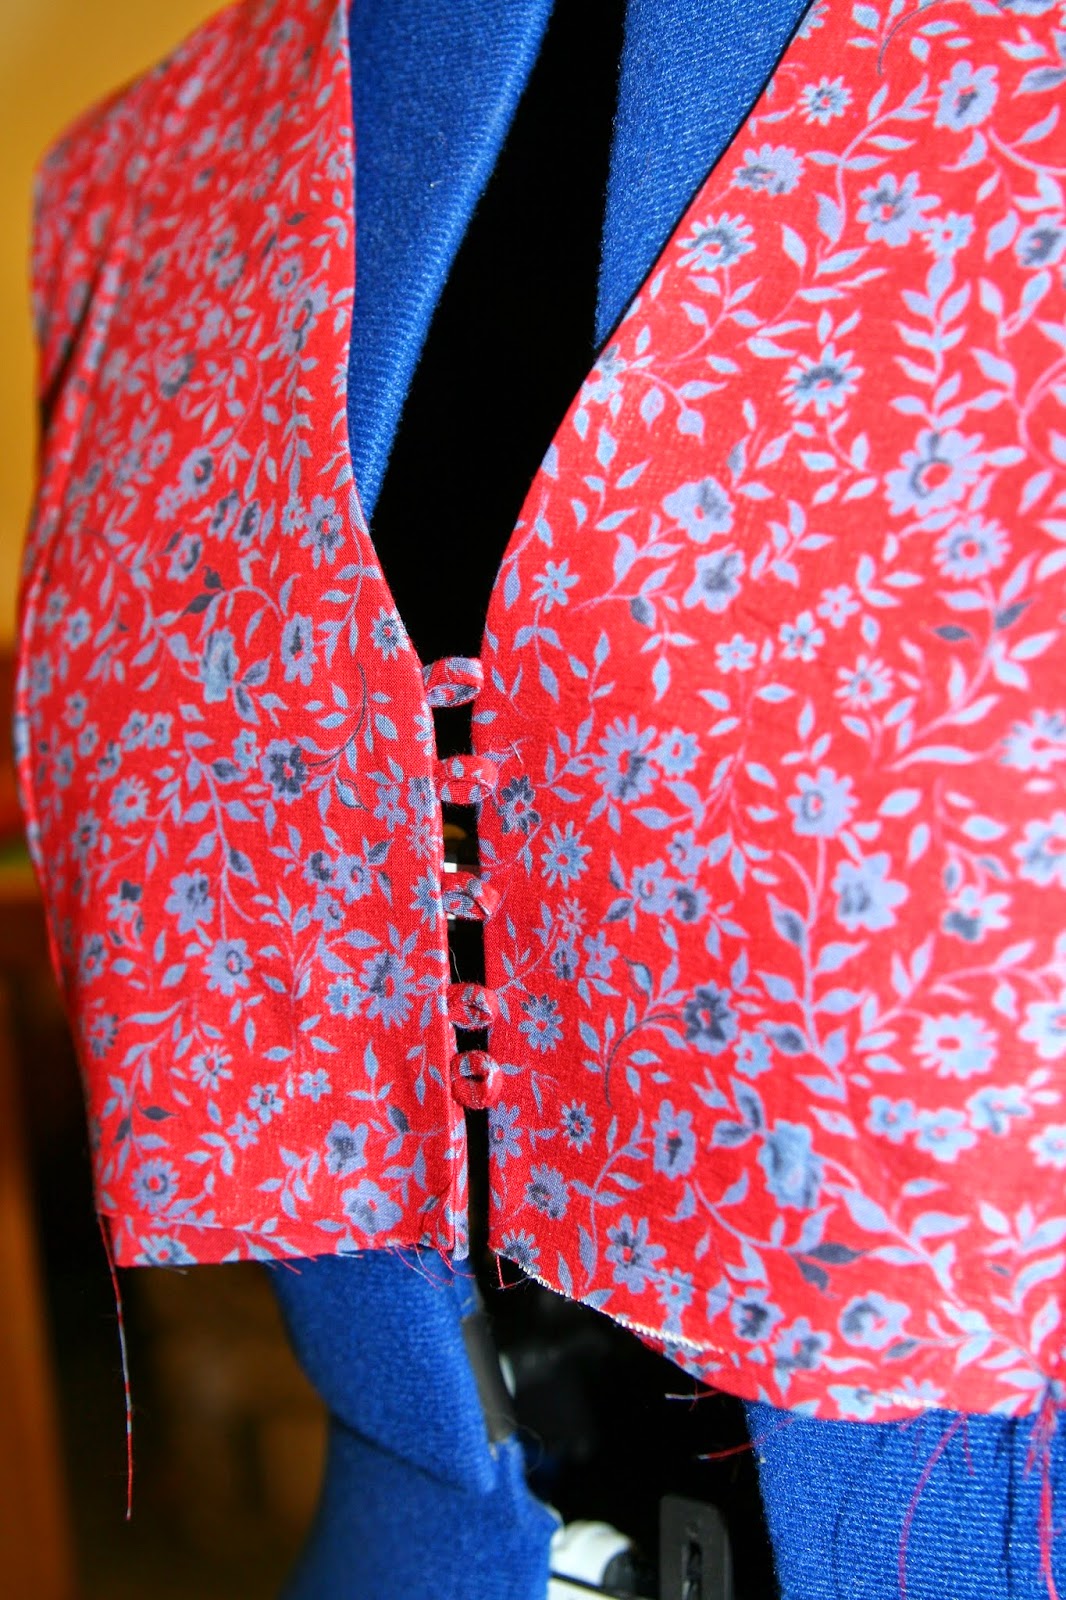
I've been working on a pretty summer dress (in a patriotic red and blue floral cotton voile) off and on for the last 4 or 5 weeks.  Normally a project like this wouldn't take quite so long, but this pattern has set me back a few times and I had to walk away for a bit and start fresh.

  • I saw this dress in the April 2014 issue of Burda Style Magazine (British version) and immediately went and bought fabric and supplies
  • When I went to trace the pattern I realized with horror that it was in tall sizes.  I am petite (5'2").
  • Not to be defeated, I began complex pattern alterations to shorten the bodice.  This bodice is made up of many, many pieces and this took some time to get right.

Now I am finished sewing the bodice and I'm so pleased I wanted to share a "progress report."

One of the things I love about Burda patterns is the detail.  Initially the garment may look simple, but once you get in sewing it the intricacies become more apparent.

Here's some of the details I love in this dress:


Seam lines.  Beautiful princess seam shaping in the bodice and a unique bib front construction.  Also pretty little cap sleeves.

Button loops.  Let me tell you that sewing a 1/8" wide tube of fabric and turning it inside out takes some patience but it is such a couture sort of touch.  I LOVE them.


Pleats.  Lest you think Burda ignored the back look at these beautiful pleats!

Here is a photo from the magazine of the finished dress (on a really tall girl).


120_large


Make something beautiful! (and challenging!)
Jen

Saturday, June 7, 2014

French Market Earrings

Have I mentioned that I dabble in jewelry making on occasion?  I just do simple wire-wrapped designs.  Here's a pair of earrings that I purchased as a kit from Beadaholique.  I love their old-world vintage look.  They look like little miniature lanterns you might find lining a street in the French Quarter of New Orleans.


They are simple to put together and Beadaholique includes instructions in their kit.
I used three jewelry making tools:  chain nose pliers, round nose pliers, and flush cutters.  If you have these, you can do basic wire wrapping.


For a great tutorial on making a wire-loop watch this video from Beadholique:


I put these earrings together in about 15 minutes.  Jewelry making can be a wonderful, quick creative fix.  Give it a try.
Make something beautiful!

Jen

Tuesday, May 6, 2014

Sweetly Scented Gift

 Sachets are a lovely (and sweet smelling) gift.  They can be made quickly and simply, or you can spend time making them more elaborate.  For the ADD crafter, they appeal on a few levels:  you can mix and match scents to appeal to your inner perfumer, you could call on your inner gardener/herb cultivator and dry and mix your own potpourri, and it appeals to quilting, fashion, hand embroiderers, and home dec sewers.

Here is an original design I came up with as gifts for some very special ladies in my bible study group.  We studied 1st and 2nd Peter. One of Peter's purposes in his letters was to remind of us of who we are in Christ and God's promises for us.  Since our sense of smell is a powerful memory trigger, I thought it would be fitting to make sachets for them.

:

  • I cut 5" x 5" squares from linen fabric
  • I cut the layered flowers from some beautiful merino wool felt (purchased from Gingermelon's beautiful Etsy shop) using the Stampin' Up! Floral Framelits dies and Big Shot die cutter.
  • I grouped the cut flower pieces together and machine stitched them in the center to one linen square using a stitch length of 1.5
  • I then hand embroidered the flower centers making french knots with golden-yellow embroidery floss to hide the machine stitching
  • I sewed another linen square to the linen square with the flower, right sides together, with an 8" piece of satin cord folded in half at the corner (I double stitched the corner with the the cord), leaving a small (1.5" - 2") opening to turn it.
  • I stuffed it lightly and added scented aroma beads* and then stitched it closed using a ladder stitch

*Aroma Beads are amazing little plastic beads that absorb fragrance oils and smell good for months and months (some have lasted years).  I get them from Natures Garden Wholesale Candle and Soap Supplies as well as the fragrance and essential oils that I use to make the various scents.

The scents I used for these sachets were Gingered Bergamot (this smells heavenly) and Lemon Neroli (a blend of Juicy Lemon fragrance oil and Neroli essential oil).


Make something beautiful!
Jen

Friday, April 25, 2014

More Doll Making - Rosebud


I finished my lavender-haired cutie doll for my one year old niece.  I call her Rosebud for obvious reasons, but my sweet niece may call her whatever she likes.


She is toddler friendly - some of this is inherent in the pattern design from the Storybook Toys book:
  • embroidered face - no buttons to choke on, no paint to fade.  If the stitching comes out it can easily be re-done.
  • no buttons or clasps on her clothing that could be choking hazards
  • stuffing is non-allergenic
  • clothes are made with velcro closures or pull-on elastic to make it easy to dress and undress her.
  • If her hair comes undone, it can also easily be re-done.
  • she is about the size of an American Girl doll, so it will be easy to buy (or make) her more clothes.


Here's a little detail picture of the kitty embroidered on her shirt:


  • I sketched a cat (because little girls need to have cute kitty cats on their shirts)
  • Then I traced it with water soluble marker onto the shirt front
  • I used a back stitch with 2 strands of embroidery floss to out line the design and to do the nose, mouth, and whiskers (this type of hand embroidery is EASY - there are many books on this subject)
  • I made french knots for the eyes
  • The purple coloring is done with a crayon and a blender pen and then heat set with my iron (with a piece of paper over the design to protect the iron and fabric).
I am ready to switch gears in my sewing (I've got several summer dresses planned), but I cannot recommend this Storybook Toys book highly enough.  If you are at all interested in doll or toy making this is a valuable resource and worth its price many times over.

Make something beautiful!
Jen

PS - here's a sneak peak at the dress I'm working on:

120_large

Sunday, April 6, 2014

Easy, Quick, and Adorable Kitty Pillow


Here's a lovely, nearly instant gratification project that would make an excellent gift for a young child.  It's a kitty pillow - done in super cute Japanese Hello Kitty style.  It's incredibly simple to make.  The longest amount of time is spent with hand embroidering the mouth and whiskers - which you could easily do with your sewing machine if you did not have patience for hand work.


I got this adorable pattern from my current favorite sewing book, Storybook Toys by Jill Hamor.  She includes a pattern for a 10" pillow and a 14" pillow.  I did the 10" pillow because it is for my niece who is one - little pillow for a little girl.  Just in case you were wondering...10" pillow forms are a little bit difficult to locate, which is something I didn't realize until after I had sewn this cute pillow case.  I ended up finding them on Etsy here, but you might be lucky and find them at your local craft store.  The 14" seems to be more common.


  • The eyes and nose are cut from felt.  I machine stitched them in place
  • The whiskers and mouth are hand embroidered with an outline stitch, but you could do it with a machine stitch too
  • The back is two overlapping pieces that create an opening for a pillow insert


This makes such a sweet child's pillow.  It would be great fun to try other animal faces.


Make something beautiful!
Jen


Saturday, April 5, 2014

More Doll Making Adventures

I am so inspired by the projects in the book, Storybook Toys by Jill Hamor.  I'm planning all sorts of dolls and other toys from this amazing book.
I am working on a few things to send to my niece, Anastasia, who just turned one.  She's my only niece on my side, so that makes her extremely special.

Here is the doll I am working on for her.  I went for a more Japanese cuteness style - which I love.  The pinky-lavender hair is soooo pretty and sweet.  I did a low bun hair style - reminiscent of Princess Leia (a special sci-fi detail my brother will appreciate).  The eyes are solid black instead of colored irises for a more stylized, cartoonish look. 


Once the head/body is sewn and stuffed, face embroidered, and hair completed the doll is really about 80 percent complete.  Of all these steps the hair takes me the longest (4-6 hours) and hurts my fingers the most.  I have some excellent callouses building up on the tips of my pointer and middle finger in my right hand (I prefer the callous to thimbles - I hate thimbles:  fumbling awkward horrible things).


 I love working with yarn for hair.  I can't knit or crochet so this fulfills my desire to play with beautiful yarns and squish those pretty soft yarn balls.  This yarn is Rowan Creative Focus Worsted, 75% wool, 25% alpaca.  The color is called "soft pink."


Make something beautiful!
Jen