Friday, January 2, 2015

New Year's Corduroys

I want my sewing in 2015 to be prolific and productive.  I think each New Year of all the ways I'd like to change and improve and the list gets longer and longer until I realize it would really be impossible to achieve every single goal - there aren't enough hours in a day and frankly, the extra 10 pounds are worth the happiness of eating what I want.

I do, however, have one simple resolution for this year:  sew everyday.  No rules on how long or how much, just sew and do it daily.  My mind is brimming with what I want to accomplish:  a wardrobe of beautiful suits for work, gorgeous perfectly fitting designer jeans, my child in adorable, unique clothes, my husband in custom fit dress shirts, my home decorated with custom draperies, slipcovers, and hand embroidered pillows and wall hangings, craft more beautiful dolls.  No way can I possibly do all this.  But I can sew everyday and by doing so, I know that some of these will be accomplished.

I got a tool to help me with this:

http://fashionary.org/planner/

It's a smallish sized planner where I can write briefly what I sew each day and on the facing page there are blank lines for additional notes on the projects I'm sewing that week.

My side resolution is to participate in some form of sewing education each day.  That is: watching a video (I've got a whole bunch of classes I bought at Craftsy to keep me busy) or reading a sewing article (Threads magazine is excellent) or sewing book or book on fashion or fashion history.  I haven't placed time limits on this either - I think that is freeing.

If you haven't read The Artist's Way by Julia Cameron I highly recommend it. I think anyone - even those who don't think they are creative - can find benefit from part, if not all, of her book.  My goals for sewing are in part based on Ms. Cameron's techniques.  (Morning pages are one of the best disciplines and benefits of her method).

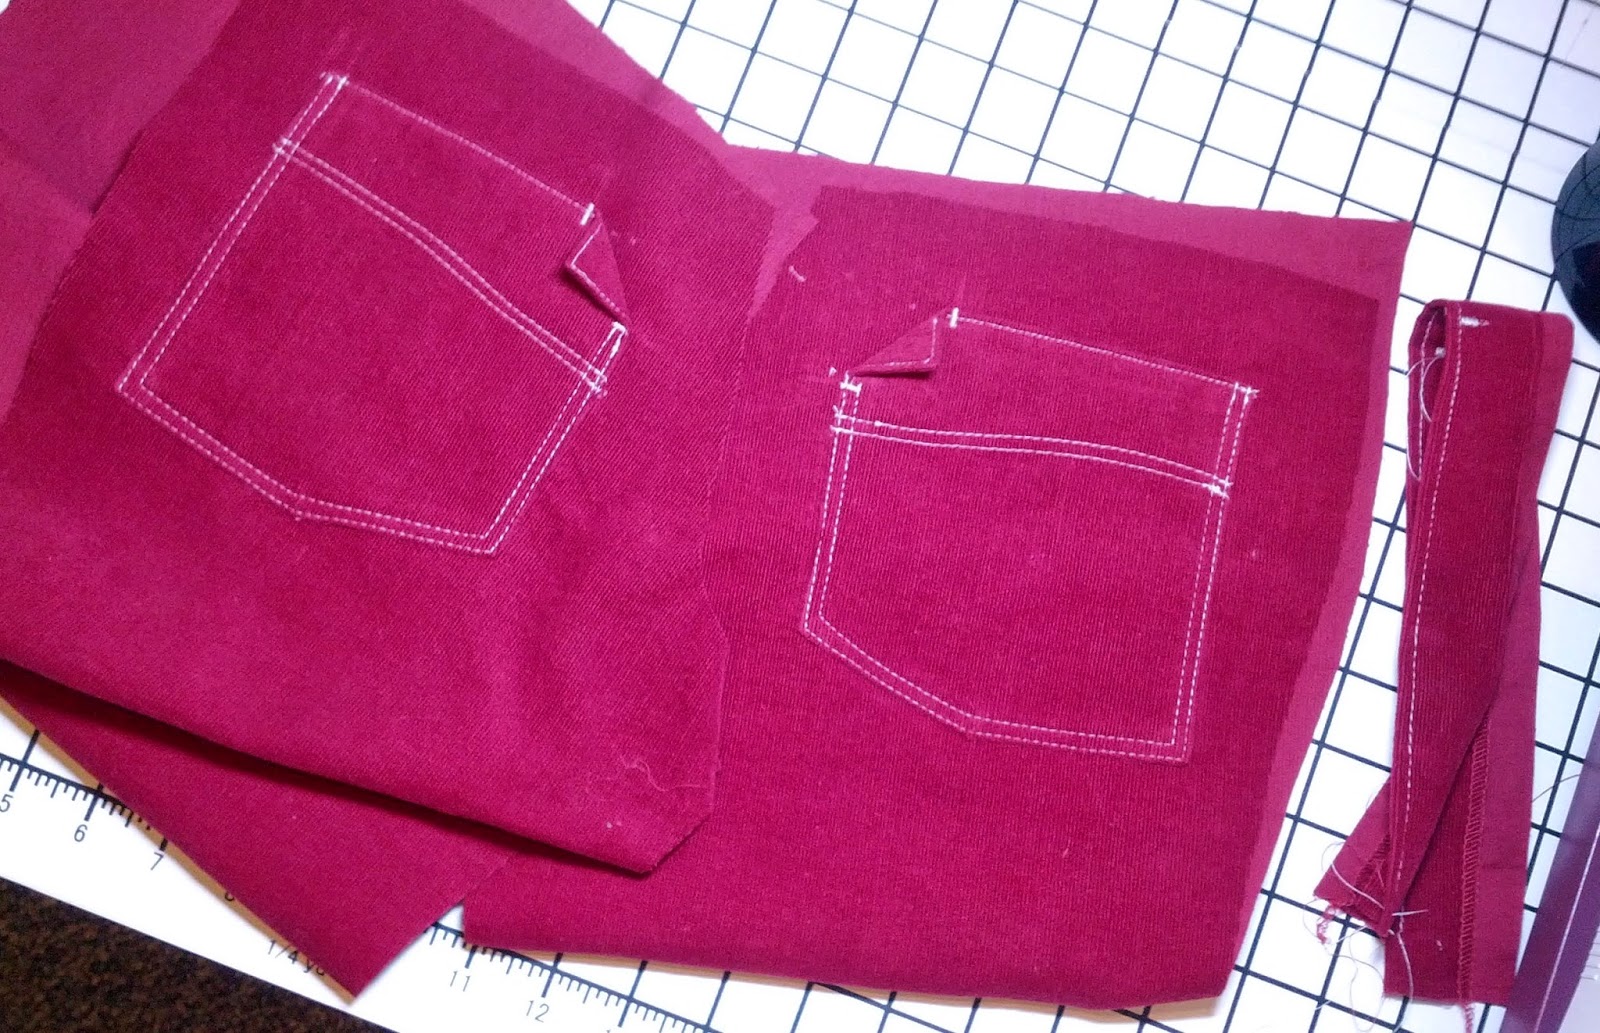
If you haven't clicked away from my blog yet, I will show you my progress for the first two days of January:

Rivets:

I think I mentioned in a prior post that I'd go into more detail with rivets - here you go.

First the Tools:


  • Hammer
  • Sample block of man-made "quartz" (I got this when we were remodeling our kitchen and choosing new countertops)
  • Rivet
  • Eyelet Cutter
  • Snippers (for cutting the base of the rivet) borrowed from my husband who has many tools for model rocketry that are quite useful for sewing.
Process:

  • Place the fabric on the quartz.  You could use something similarly hard - metal or other, but wood is too soft.
  • Use the eyelet cutter to punch a hole in the fabric for the rivet.  Position the cutter and gently tap a few times with the hammer.
  • Place bottom piece of rivet underneath and through the hole.
  • Then snip it down so it's only a smidge (that's technical) above the fabric (see below)
  • Place the top of the rivet over the bottom and gently hammer (with the quartz underneath)
  • Turn it over and hammer from the back side until it is securely set.
  • Voila!  Rivet!
I also sewed the back yokes on today.  Yesterday I did the front pockets.  Steps left:  Fly front/zipper, side and inseams, waistband and beltloops, front button and hemming.

Make something beautiful!
Jen


Tuesday, December 9, 2014

Christmas Corduroys Continued - Back Pockets and Top-Stitching Tips


Typical instructions for pant/jean construction have you start with pockets.  These tend for me to be some of the trickiest - especially when doing clever and interesting pockets with lots of top stitching.  They really show off your sewing skills (or lack thereof).

These back pockets took a bit of patience.  The top of the pattern piece is a curved line which becomes (when sewn and folded down) the guide mark to stitch the wavy/curved top stitching that goes diagonally across the pocket.


The top of the pocket is edge stitched (stitched very close to the edge) prior to attaching it to the pants back.  This can be tricking as some machines like to grab and pull the fabric down in the feed dogs.

To help make this go more smoothly, I use a "hump-jumper" which is simply a piece of fabric of like-thickness that I place under my machine foot and behind the starting point of where I want to stitch.  This keeps the foot level and keeps the fabric from getting pulled down into the bobbin and jammed.  You can see the strip of fabric I used in the picture below.


My next top-stitching best friend is my bi-level top stitch foot.  It has a groove underneath the foot that fits the edge of the fabric and guides it for a nice straight line.  I move my needle position to place the stitching exactly where I want it.  This is great for double stitching.  I set my first row of stitching needle position at 2mm and my second at 6mm.  A picture of the bi-level top stitch foot is below.


The folded corners will have a jean stud inserted - I'll put that process in the post when I do the fly and the jean button.

Also, I have a bar-tack stitch on my machine which I used to make the bar-tacks on either side of the folded corner.  You could easily do this adjusting the zig stitch on your machine.

Next up - front pockets.

Make something beautiful!
Jen

Thursday, December 4, 2014

Christmas Corduroys

After being a stay at home mom for 7 years, I am back to work full time - and have been for the last six months.  I love this new phase of my life, but it has left little time for sewing.  I have some New Year Resolutions regarding that, but that is for another post.

I usually have a plethora of Christmas projects and gifts to sew, but this year I simply do not have time.  I am, however, sewing one Christmas gift (well, two actually - it is an outfit) for my son - who, alas, is growing at an alarming rate and will soon be too large to sew the cute clothes in my favorite children's sewing magazine - Ottobre Design.

Ottobre hit it out of the park with cute boy designs in their latest issue.


 I am making my son the red corduroy jeans and chevron style multi-colored sweatshirt on pages 18-19.


The whole outfit is darling, but I especially love the corduroys.  The have a curved leg seam and some completely awesome back pockets - not to mention fabulous top stitching.  Ottobre designers are so very clever and creative.

I'm taking this project in steps - doing a little each night - so I don't end up in a panic on Christmas Eve.  I'm also taking notes and developing a plan to make me a more organized and effective sewer along the way.

Here's the pre-work that's been done:

  • Pre-washed and ironed fabric
  • traced pattern and added seam allowances
  • cut pattern out of fabric and added all markings
  • Threaded up serger and tested on fabric
  • threaded up sewing machine and wound bobbins of sewing thread and top stitching thread
  • Tested top stitch length setting (both cross-wise and length-wise as it will look different on the corduroy because of the nap)

I've noticed on ready-to-wear jeans that the top stitching is a much longer stitch length than the standard 2.5mm length that my home-ec teacher drilled into my head.  I decided that my favorite look is the 4.0mm length

Threads and bobbins ready to go! (This is a first for me).


 Serger threaded and tested! (I love this machine - it stitches perfectly all the time - she is also newly back from a tune up at the sewing store and in tip-top shape).  It is an oldie but goodie - a Viking Huskylock 1002LCD (it does the coverstitch too!). 

My sewing machine.  My previous machine I named Christine because it was possessed.  This one is my precious.  This is a Pfaff 2170.  It's also an oldie but goodie.  Not only does it sew beautifully and have 300+ decorative stitches, it also embroiders beautifully too.  I have reviewed this machine on patternreview.com in detail.  Click here


A view of my sewing area (so you cannot see the mess behind the camera).  Also that corner next to the sewing machine is where I take almost all the pictures for my blog :)

Tomorrow I start on the back pockets.

Make something beautiful.
Jen


Sunday, July 6, 2014

Pretty Summer Sun Dress

I don't wear a lot of dresses.  I like the freedom of pants - wearing a skirt or a dress means I have to concentrate a lot harder on being lady-like.  However, I am drawn to pretty dresses and I'd really like to incorporate them into my wardrobe - and be more comfortable wearing them.

I thought this Burda dress (from the April 2014 magazine, pattern 120) was particularly pretty.  I love the pleating details and little button loop front closure.  It's not a dress style I would normally choose, but I hoped it would end up looking as flattering on me as it did on the model, even though I am not tall and thin but actually really short and sturdy.

120_large

That being said, my initial impression after finishing and trying it on was that it looked like a maternity dress.  I'm not used to having all this flowing, floaty fabric, so I was considering wadding it up and throwing it my "learning experience" trash can.

I decided, though, to have my husband take a couple of photos of me in the dress so I could get a better perspective on how it looked.  I think I like it.


(my eyes are closed, but this was the best picture of the dress )

Cute back view

Lots of room for putting away some serious barbecue

Pregnant or Burrito Grande?  Burrito Grande.


Anyhow, I'm so glad to be done with this project.  I'm sure I'll wear this at least a few time this summer (and mom, I've got a slip on underneath :)).

Pattern / Sewing Details:

  • Intermediate level sewing.  Button loops, pleats, lined bodice, princess and curved seams, elasticized waist - some of these details are quite tedious
  • The pattern is drafted beautifully - everything lines up - even with all the alterations I made to take from a "Tall" to a "Petite" size
  • I know generally people get frustrated with Burda instructions but I found them to be more than adequate with no really confusing directions.
  • Interface the tie bands unless you want them to twist and wrinkle and look cheap and home made. 

I've got a couple of gorgeous blouses up next from this so-stylish pattern from Hotpatterns and the fabric is this amazing Roberto Cavelli silk-like cotton print that my mom brought me back from Cyprus.


http://www.hotpatterns.com/hp-1137-riviera-summer-breeze-sleeveless-tops/ 


Make something beautiful!
Jen

Tuesday, June 17, 2014

Summer Patriotic Dress

I've been working on a pretty summer dress (in a patriotic red and blue floral cotton voile) off and on for the last 4 or 5 weeks.  Normally a project like this wouldn't take quite so long, but this pattern has set me back a few times and I had to walk away for a bit and start fresh.

  • I saw this dress in the April 2014 issue of Burda Style Magazine (British version) and immediately went and bought fabric and supplies
  • When I went to trace the pattern I realized with horror that it was in tall sizes.  I am petite (5'2").
  • Not to be defeated, I began complex pattern alterations to shorten the bodice.  This bodice is made up of many, many pieces and this took some time to get right.

Now I am finished sewing the bodice and I'm so pleased I wanted to share a "progress report."

One of the things I love about Burda patterns is the detail.  Initially the garment may look simple, but once you get in sewing it the intricacies become more apparent.

Here's some of the details I love in this dress:


Seam lines.  Beautiful princess seam shaping in the bodice and a unique bib front construction.  Also pretty little cap sleeves.

Button loops.  Let me tell you that sewing a 1/8" wide tube of fabric and turning it inside out takes some patience but it is such a couture sort of touch.  I LOVE them.


Pleats.  Lest you think Burda ignored the back look at these beautiful pleats!

Here is a photo from the magazine of the finished dress (on a really tall girl).


120_large


Make something beautiful! (and challenging!)
Jen

Saturday, June 7, 2014

French Market Earrings

Have I mentioned that I dabble in jewelry making on occasion?  I just do simple wire-wrapped designs.  Here's a pair of earrings that I purchased as a kit from Beadaholique.  I love their old-world vintage look.  They look like little miniature lanterns you might find lining a street in the French Quarter of New Orleans.


They are simple to put together and Beadaholique includes instructions in their kit.
I used three jewelry making tools:  chain nose pliers, round nose pliers, and flush cutters.  If you have these, you can do basic wire wrapping.


For a great tutorial on making a wire-loop watch this video from Beadholique:


I put these earrings together in about 15 minutes.  Jewelry making can be a wonderful, quick creative fix.  Give it a try.
Make something beautiful!

Jen

Tuesday, May 6, 2014

Sweetly Scented Gift

 Sachets are a lovely (and sweet smelling) gift.  They can be made quickly and simply, or you can spend time making them more elaborate.  For the ADD crafter, they appeal on a few levels:  you can mix and match scents to appeal to your inner perfumer, you could call on your inner gardener/herb cultivator and dry and mix your own potpourri, and it appeals to quilting, fashion, hand embroiderers, and home dec sewers.

Here is an original design I came up with as gifts for some very special ladies in my bible study group.  We studied 1st and 2nd Peter. One of Peter's purposes in his letters was to remind of us of who we are in Christ and God's promises for us.  Since our sense of smell is a powerful memory trigger, I thought it would be fitting to make sachets for them.

:

  • I cut 5" x 5" squares from linen fabric
  • I cut the layered flowers from some beautiful merino wool felt (purchased from Gingermelon's beautiful Etsy shop) using the Stampin' Up! Floral Framelits dies and Big Shot die cutter.
  • I grouped the cut flower pieces together and machine stitched them in the center to one linen square using a stitch length of 1.5
  • I then hand embroidered the flower centers making french knots with golden-yellow embroidery floss to hide the machine stitching
  • I sewed another linen square to the linen square with the flower, right sides together, with an 8" piece of satin cord folded in half at the corner (I double stitched the corner with the the cord), leaving a small (1.5" - 2") opening to turn it.
  • I stuffed it lightly and added scented aroma beads* and then stitched it closed using a ladder stitch

*Aroma Beads are amazing little plastic beads that absorb fragrance oils and smell good for months and months (some have lasted years).  I get them from Natures Garden Wholesale Candle and Soap Supplies as well as the fragrance and essential oils that I use to make the various scents.

The scents I used for these sachets were Gingered Bergamot (this smells heavenly) and Lemon Neroli (a blend of Juicy Lemon fragrance oil and Neroli essential oil).


Make something beautiful!
Jen